Usage
This documentation supports two types of data contributions:
Open and freely accessible content: Related to Open-Source projects and publicly available tools.
Closed and internal content: Related to in-house tools and workflows.
The examples and explanations in this documentation focus on the first use case. Specific requirements for secured, internal data contributions are described later.
Add Data
Use Cases
Use cases are the starting point for both Classification and Qualification. They describe the tasks to be performed and the expected results. Use cases are linked to specific tool features that help achieve the desired outcome.
The most critical aspect of a use case is its Tool Impact (ti)
level: - TI = 2: Indicates a safety-relevant impact on the final
product. - TI = 1: Indicates no safety relevance.
Only use cases with a TI level of 2 require further examination.
Use cases are stored in the /use_cases folder.
Example
.. usecase:: Document SW architecture    <- Title
   :id: UC_SW_ARCH                       <- Unique ID
   :inputs:                              <- Needed input artifacts
   :outputs:                             <- Result artifacts
   :tools: TOOL_SPHINX, TOOL_SN          <- List of used tools
   :features: FE_SPINX_ARCH              <- List of used features
   :ti: 2                                <- Tool impact level

   Create documentation to document and track software architecture.

   The documentation is used as part of an official release delivery.
Features & Faults
A feature describes a specific functionality of a tool. During its execution, certain faults may occur, which are documented as sub-needs within the feature.
An important attribute of both features and faults is the Tool Error
Detection level (TD), which indicates how well a fault can be
detected: - TD = 1: The fault is detected, and execution stops
without producing a final result. - TD = 2: The fault is reported,
but execution continues. - TD = 3: The fault occurs silently
without detection.
The feature’s TD value is determined by the “worst” TD level of
all its related faults.
Features are stored in tool-specific folders, such as /tools/sphinx/.
Example
.. feature:: Read Traceability objects          <- Feature title
   :id: FE_SN_READ                              <- Unique ID
   :tools: TOOL_SN                              <- Tool link
   :td:                                         <- Combined Tool Error Detection level

   Read Traceability objects from rst/md files
   into the internal storage.

   .. fault:: Syntax errors in rst/md files     <- A first fault with title
      :id: ER_SN_SYN_ER                         <- Unique ID
      :td: 1                                    <- Tool Error Detection level

   .. fault:: Missing external needs.json file  <- A second fault with title
      :id: ER_SN_JSON_NOT_FOUND                 <- Unique ID
      :td: 3                                    <- Tool Error Detection level
Hint
The td option is only available in the Qualification package.
Restrictions
Restrictions define ways to avoid specific faults, such as by not using certain functions or configurations. They are linked to one or more faults.
During tool execution, compliance with restrictions should be checked automatically or through a manual process.
Example
.. restriction:: Do not use dynamic functions      <- Title
   :id: CHECK_SN_NO_DYN                            <- Unique ID
   :avoids: ER_SN_DYN_INVALID, ER_SN_DYN_WRONG     <- Links to faults

   Dynamic functions can execute unqualified code,
   which has full access to all Sphinx-Needs data.
   This can corrupt the data.
Checks
Checks are responsible for the following tasks:
Verifying if a fault has occurred.
Ensuring that a restriction has been followed.
Like restrictions, checks are linked to faults and are often implemented as additional scripts executed during tool execution in a CI system.
Hint
Checks are defined in the Qualification Kit section and are not part of this Classification documentation.
Test Cases
Hint
Test cases are documented in the Qualification Kit section and are not part of this Classification documentation.
Internal Documentation
In many cases, the toolchain is a mix of Open Source, commercial, and internal tools. As a result, the Classification and Qualification process must align with the access policies of these tools.
This documentation focuses on publicly available tools. Internal tools should be documented in a separate internal project stored in private repositories.
The documentation concept used here can be copied or extended to create internal documentation projects.
Create Your Own Internal Project
Using Sphinx and its sphinx-quickstart command, you can
quickly create a Sphinx-based documentation project.
Requirements
uvinstalled.
Steps
Create a new folder and navigate to it:
mkdir new_project
cd new_project
Initialize the project with
uv:uv init
Add Sphinx as a dependency:
uv add sphinx
Run the Sphinx quickstart command and follow the prompts:
uv run sphinx-quickstart
Open the project in an IDE, such as VS Code:
code .
Use this documentation’s configuration as a baseline. Copy the following files:
conf.pyfrom https://github.com/useblocks/sphinx-safety/blob/main/conf.pypyproject.tomlfrom https://github.com/useblocks/sphinx-safety/blob/main/pyproject.tomlubproject.tomlfrom https://github.com/useblocks/sphinx-safety/blob/main/ubproject.toml
Update the copied files with project-specific values, such as
nameanddescription.Sync dependencies:
uv sync
Build the documentation:
uv run sphinx-build -b html . _build/html/
Open the generated documentation in a browser:
_build/html/index.html
Done!
Reuse This Documentation
There are several ways to reuse parts of this documentation:
Use Imported needs to import Sphinx-Needs objects from this documentation.
Use External needs to create links to objects from this documentation.
Use the
includedirective to import reStructuredText (rst) code from this documentation.Use symbolic links (symlinks) to reference files at the file system level.

For the last two options, integrating this repository as a git submodule
is recommended. If you use a submodule, ensure that the submodule
folder is added to the exclude_patterns configuration option in
the conf.py file to prevent this documentation from being built
unintentionally.
Include Mechanism
The following image illustrates the connection between files in this Classification project and files in a separately created project.

The Classification files are made locally available using the git submodule mechanism. The newly created project is stored in parallel to the Classification project.
This setup allows the use of the include directive. For example,
to include the file own-docs/tools/sphinx/features.rst, use the
following:
.. include:: /../sphinx/classification/tools/sphinx/features.rst
Hint
It is recommended to copy the folder and file structure of the Sphinx Classification documentation. This ensures that all links and references work without requiring modifications.
The .. include:: directive copies the entire content of the
specified file into the “extended” version. This includes headlines,
image directives, and other content.
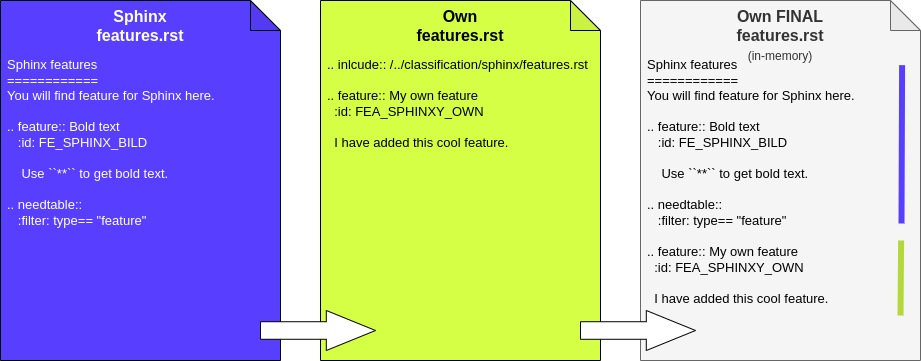
The include way of working.
This integration method is also used for the Qualification Kit. This means that an integrated or linked Classification documentation can easily be replaced by a link to the Qualification documentation. Both projects follow the same folder and file structure, ensuring seamless integration.